
Securing SharePoint Lists: A Complete Guide
Protect Data Integrity While Using Lists in Power Apps
Permission Strategies, Automation & Best Practices
When using SharePoint Lists as the data source in Power Apps, you face a fundamental security challenge: users need access to the underlying list to use your app, but granting that access opens the door for them to bypass the app entirely and modify data directly. This bypassing can cause data corruption, audit trail problems, duplicate entries, and loss of business logic enforcement. This comprehensive guide walks you through proven strategies for securing SharePoint Lists—from permission management to advanced Power Automate automation—so your data stays protected while your users remain productive.
The Security Challenge: Why Direct List Access is Dangerous
The problem is simple but critical: Power Apps applications are designed to enforce business logic, validation rules, and controlled workflows. But if users have access to the SharePoint List itself, they can:
Risks of Uncontrolled List Access (when using PowerApps)
- Bypass Validation: Create records without required fields, corrupting data quality
- Circumvent Workflows: Skip approval steps, status changes, or escalation procedures
- Break Audit Trails: Edit or delete records, losing compliance documentation
- Data Duplication: Create duplicate entries when systems rely on unique identification
- Introduce Errors: Manually edit data in ways that break relationships and calculations
- Security Breaches: Access data they shouldn't see or modify data outside their role
The solution isn't to deny access entirely—users need to interact with data. The solution is to control how they access it. That's what this guide covers: multiple strategies from hiding lists to automating permissions to using alternative architectures.
Layered Security: A Multi-Strategy Approach
Enterprise security follows the principle of "defense in depth"—multiple layers so that if one fails, others still protect you. We'll cover a range of strategies from simple (hiding lists from navigation) to sophisticated (dynamically setting item-level permissions via Power Automate). You can combine these based on your security requirements.
Security Layers Overview
- Visibility Control: Hide lists from users entirely
- Access Control: Limit who can view or edit lists
- Item-Level Control: Restrict access to specific records based on ownership or role
- Automation: Use Power Automate to enforce permissions automatically
- Architecture: Use alternative data sources (Dataverse, SQL) for maximum control
Strategy 1: Hide Lists from Direct Access
"Out of sight, out of mind" is surprisingly effective. If users can't see a list, most won't try to access it. Here are several methods, from simplest to most technical:
Remove from Site Navigation & Content
Difficulty: Easy | Effectiveness: Low (determined users can still find it)
Remove the list from Site Navigation and hide the "Site Contents" button. Users won't accidentally stumble upon it, but anyone intentionally looking for SharePoint lists can still find it.
How to implement: Site Settings → Navigation → Remove list from current navigation. Then Site Settings → Site Collection Navigation → remove "Site Contents" from navigation bar.
Use a Dummy Default View
Difficulty: Easy | Effectiveness: Medium
Create a view that returns no results (using an impossible filter condition) and set it as the default view. If users do access the list directly, they see nothing.
Example filter: Status equals "NeverExists" where no records can have that value.
Pro tip: Combine with navigation removal for better protection.
Disable Search Indexing
Difficulty: Easy | Effectiveness: Low (more for performance than security)
Turn off indexing so the list doesn't appear in search results. Go to List Settings → Advanced Settings → Search and Indexing → set "Allow this list to appear in Search Results?" to No.
When to use: Combine with other methods. Alone, it's insufficient.
Use PowerShell to Hide the List Entirely
Difficulty: Medium | Effectiveness: High
Use PnP PowerShell to set the list as "Hidden" so it doesn't appear in the web interface at all—though users with direct URL access can still reach it.
$listName = "YOUR LIST NAME"
$site = "https://Your SharePoint Site address/"
Connect-PnPOnline -Url $site -UseWebLogin
Set-PnPList -Identity $listName -Hidden $true
When to use: When you want maximum invisibility combined with other access controls.
Strategy 2: Restrict Access Permissions
Rather than hiding lists, you can restrict who has access entirely. This is more appropriate when only specific users (admins, data stewards) should ever access the list directly.
Create Custom Permission Levels
Difficulty: Medium | Effectiveness: High
Create a custom permission level that grants only "Create" access—users can add items via Power Apps but can't read, edit, or delete existing items.
- Go to Site Settings → Site Permissions → Permission Levels
- Click "Add a Permission Level"
- Name it (e.g., "List App Create Only")
- Check ONLY "Create Items" and "View Items"
- Remove inherited permissions from the list
- Add a security group and assign this custom permission
Pro tip: Use Azure AD security groups for easier management. One group = all users, and you manage membership in Active Directory.
Use Private SharePoint Sites or Teams Channels
Difficulty: Easy | Effectiveness: High
Create your lists in a private SharePoint site or Teams channel that only admins and app developers can access. Remove inherited permissions and add only your admin security group.
Users access the lists only through Power Apps, never directly through SharePoint.
When to use: Ideal for highly sensitive data or heavily used applications.
Strategy 3: Item-Level Permissions (SharePoint Native)
SharePoint Lists offer built-in item-level permission controls—the ability to restrict access to individual records based on who created them or role.
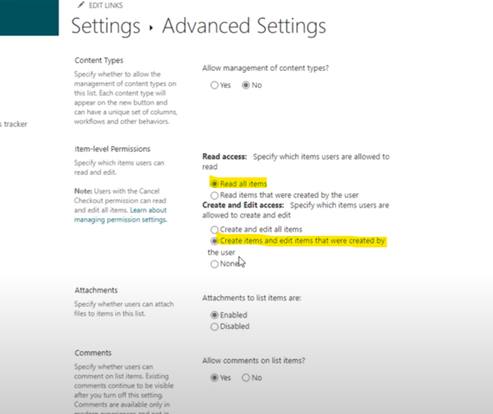
Configure Item-Level Permissions in List Settings
Difficulty: Easy | Effectiveness: Medium (manual management)
Go to List Settings → Advanced Settings → Item-level Permissions. You can configure three scenarios:
Item-Level Permission Options
- Read all items / Edit all items: No restrictions (default)
- Read items that were created by the user / Edit items that were created by the user: Each user can only see/edit their own records
- Read items that were created by the user and items that are assigned to the user: Users see their own records plus records assigned to them
This approach is effective but limited—it only understands "created by" or "assigned to" fields. For more sophisticated logic, you need Power Automate automation.
Strategy 4: Automated Permission Management with Power Automate
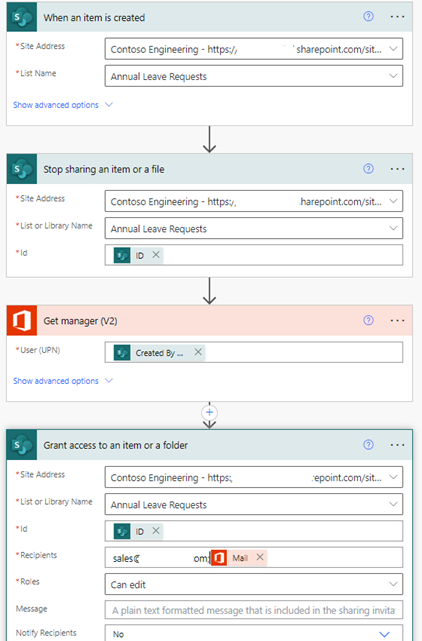
This is where modern SharePoint security becomes powerful. Instead of manually setting permissions or relying on simple "created by" logic, you can use Power Automate to automatically set item-level permissions based on any field value or condition in your list.
For example: Set permissions so only the assigned manager and the record creator can view a sensitive employee record. Or: Restrict access to financial records to the finance department. Or: Grant access based on customer relationship or regional assignment.
How Power Automate Permission Automation Works
When a list item is created (or updated), a Power Automate flow automatically sets permissions by:
- Reading values from the item (e.g., "Assigned Manager" field, "Department" field)
- Looking up related users (e.g., getting the manager's email from Active Directory)
- Using SharePoint's HTTP connector to set item-level permissions
- Granting "Read" or "Edit" access to specific users or groups based on the condition
Common Permission Automation Scenarios
- Only creator + assigned manager can read: Employee records, sensitive requests, personal data
- Only assigned department can access: Departmental budgets, internal performance reviews
- Only customers can view their own records: Customer portals, order history, support tickets
- Only sales reps can view their regional accounts: Account management, opportunity tracking
- Progressive access based on status: Only supervisors can view "Submitted" records; only finance can view "Approved"
Building the Power Automate Flow
- Trigger: "When an item is created" (or updated) in your SharePoint list
- Get User Details: Look up the manager or assigned user from Active Directory using "Get user profile"
- Grant Permissions: Use the "Send an HTTP request to SharePoint" action to call the SharePoint REST API
- Configure Access: Set "View" or "Edit" permissions for the specific users/groups
- Revoke Default: Optionally revoke the default public access so only assigned users can view
Example Scenario: Employee Records
Requirement: Only the employee, their direct manager, and HR can view an employee record. All others can only create new records but can't see existing ones.
Implementation:
- When an employee record is created, the flow reads the "Manager Email" field
- It looks up that manager in Azure AD to get their Object ID
- It calls SharePoint's permissions API to grant the manager "Read" access to this specific item
- It grants HR group "Read" access
- It keeps the creator's "Edit" access
- Everyone else gets no access to this item
Important Note: For detailed step-by-step implementation of Permission Automation flows, we recommend reviewing Microsoft's official documentation and security patterns. Reza Dorrani has excellent video tutorials on using the HTTP connector for permission management.
Strategy 5: Use Alternative Data Sources for Maximum Control
For applications with complex security requirements, consider using data sources with more granular permission controls:
Microsoft Dataverse
Dataverse (part of Power Platform) offers row-level security, ownership-based access, team-based permissions, and hierarchical access controls. It's designed for multi-tenant applications where data isolation is critical.
When to use: Large-scale applications, multi-org scenarios, complex permission hierarchies.
Trade-off: Requires licensing (per-app or per-user licenses).
SQL Server / Azure SQL Database
For maximum control, use a dedicated SQL database with row-level security, role-based permissions, and encryption. Use Power Automate flows or Azure Functions to mediate all access.
When to use: Highly sensitive data, strict compliance requirements, performance-critical applications.
Trade-off: Requires more development effort and infrastructure management.
⚠️ Avoid: Direct Power Automate Data Pass-Through
Some organisations consider using a Power Automate flow that reads/writes to SharePoint on behalf of users using a service account. This approach has serious problems:
- Users don't need SharePoint access (seems good at first)
- But creates performance delays as every read/write goes through the flow
- Offline Power Apps functionality breaks
- Audit trail shows the service account, not the actual user
- Write conflicts and timing issues emerge at scale
Recommendation: Use this approach only for one-way integrations, not as primary data architecture.
Security Best Practices & Implementation Guide
Regardless of which security strategies you choose, follow these principles:
1. Plan Security Before Building
Don't treat security as an afterthought. Define your permission model during the data design phase—it's far easier to build correctly than to retrofit security later.
2. Test With Real Users
Have actual users test your Power Apps and permission model before going live. Real-world usage patterns often reveal security gaps that theoretically "should work."
3. Use Security Groups for Access Management
Never assign permissions to individual users. Use Azure AD security groups so you can manage access centrally without touching SharePoint each time someone joins/leaves.
4. Document Your Security Model
Write down your security architecture: which lists are hidden, which have custom permissions, which use Power Automate automation. Future admins (including yourself in 6 months) need to understand what you built.
5. Audit Permission Changes
Enable SharePoint audit logging so you can track who modified permissions and when. This is critical for compliance and troubleshooting.
6. Test Your Automation Flows
When using Power Automate permission automation, thoroughly test edge cases: What happens when a user leaves? When someone gets promoted? When a record changes departments? Automate these scenarios and verify the flow responds correctly.
Security Checklist Before Going Live
- ☐ Can normal users access the list directly through SharePoint? If yes, should they?
- ☐ Are permissions set correctly for all user types?
- ☐ Can users see/edit data they shouldn't access?
- ☐ Do Power Automate flows handle all permission scenarios?
- ☐ Are security groups used instead of individual user permissions?
- ☐ Is audit logging enabled?
- ☐ Have you tested with realistic user scenarios?
- ☐ Is your security model documented?
Real-World Example: Job Management System
Here's how you might apply these strategies to a job management system (similar to our Job Management System guide):
Security Layering for Service Requests
- Visibility: Hide the Service Requests list from Site Navigation and set a dummy default view
- Access: Only service managers have list permissions; regular staff access via Power App only
- Item-Level Automation: When a service request is created, Power Automate automatically grants the assigned technician "Read" access and the customer "Read" access to only their own requests
- Workflow Protection: Power App enforces required fields and approval workflows—the list itself can't bypass them
- Audit Trail: Every change is logged in SharePoint audit, including who modified what and when
The result: A secure system where:
- Users can only access data through the validated Power App interface
- Permissions automatically adjust based on role assignment
- Customers see only their own data
- Technicians see only their assigned work
- Managers have complete visibility
- All changes are audited for compliance
Visual Reference: Permission Configuration Examples

Configuring item-level permissions in SharePoint List Advanced Settings
Setting up a Power Automate flow to automate item permissions based on list values
Creating a custom permission level for restricted list access
Conclusion: Security is a Process, Not a Feature
Securing SharePoint Lists requires a combination of approaches—visibility control, permission management, automation, and sometimes architecture alternatives. No single strategy is perfect; most mature implementations use multiple layers.
The key principle is this: Secure your data model during design, not after. Decide your permission requirements before building lists and Power Apps. It's far easier to build correctly than to retrofit security.
Start simple (hide the list, restrict access), then add sophistication (Power Automate automation) as needed. Test thoroughly, document your approach, and enable audit logging.
For complex scenarios, consider Dataverse or SQL as alternative data sources. For most mid-sized business applications, however, SharePoint Lists with proper permission management and Power Automate automation provides excellent security at low cost.
Related Resources & Reading
🔧 Case Study: Job Management System 📘 The Complete Guide to Microsoft Lists 📘 Building Job Management Systems with Lists 📗 Employee Directory Example (with Permission Control)Need Help Securing Your SharePoint Lists?
Building a secure system that balances protection with usability requires careful planning. Many organisations struggle to implement permission automation correctly or choose the wrong architectural approach for their data sensitivity.
AT Technical helps organisations:
- Design secure permission models during project planning
- Implement Power Automate permission automation flows
- Migrate from insecure architectures to proper security models
- Configure custom permission levels and access controls
- Audit existing systems for security gaps
We've helped dozens of organisations retrofit or properly design security for SharePoint-based applications. Let's review your architecture and ensure your data is properly protected.
Discuss Your Security Requirements