Microsoft Power Automate – How to check all flows to see if any are Off or Suspended

Power Automate Check Flows Introduction
Flows can often suspend or automatically switch themselves off without much notice, in this blog we look at how to automatically check the status of all power automate runs within an environment and feedback over email a spreadsheet of all flows and the status of each, meaning that flows which become suspended or switched off can be picked up quickly.
Typically there are two or three reasons why flows will be suspended or switched off, these are:
– The Flow has been continuously reporting errors
– The Flow has not ran for a extended period of time usually about 3 months
– Flow owner or admin initiated: The owner or admin of the flow manually turned it off or suspended it. This might happen if they need to modify the flow or if there is an issue that needs to be resolved.
– Authentication errors: Flows that require authentication to access a service or application may stop running if the credentials or authentication token expires or becomes invalid. In this case, the flow will automatically turn off or suspend until the authentication issue is resolved.
– Resource limitations: If a flow uses too many resources or runs for too long, it may exceed the limits set by the service it is using. This can cause the flow to be suspended or turned off.

Creating a Power Automate Flow to check on the status of all other flows

Next create an Excel Table and set the table headers as follows, Date | Modified Date | Flow Name | Flow State – then save the Excel file and add it to either One Drive or a SharePoint Document library.
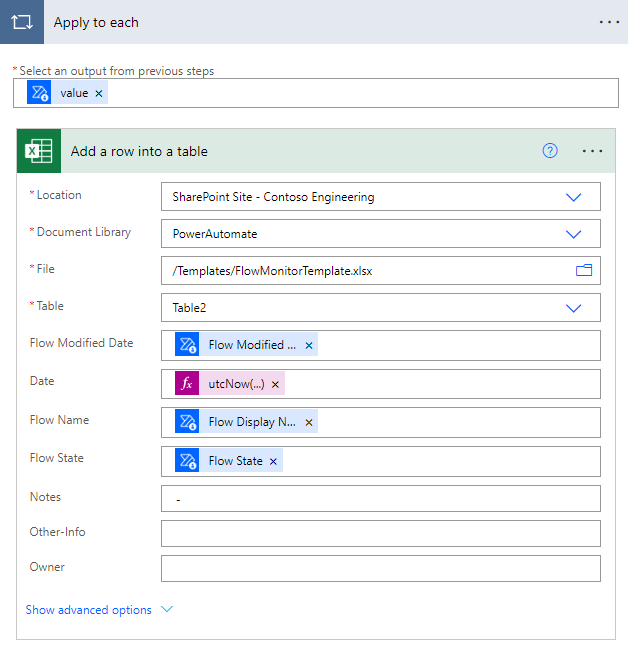
Inside the Apply to each loop add an Excel action Add a row into a table, using the settings in this action point them to the Excel file you have uploaded to either SharePoint or OneDrive.
Finally map the flow modified date, Flow name to flow display name and flow state to the flow state as demonstrated.
Add any other actions that you want to perform based on the status of the flow runs, such as sending an email or updating a SharePoint list.
Save and test your flow.
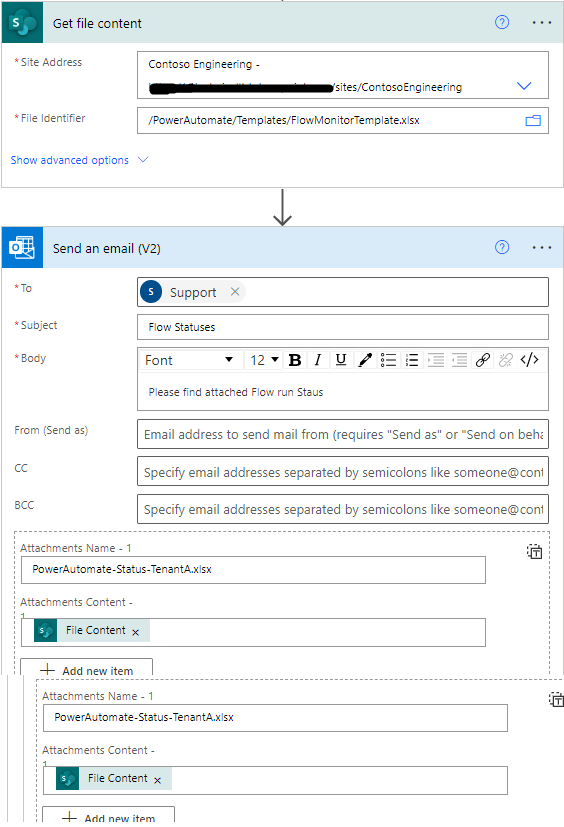
To get the notification, you will need to add an action underneath the apply to each (it has to sit outside of the apply to each action)
First of all get the content if the Excel template table is stored in Onedrive you will need to use the get file content for OneDrive Action if it is SharePoint use the SharePoint one like we have.
Next add the action send email (V2) and specify the address/es you want to send to give it a subject, give the email some body such as power automate flow statuses, then in the advanced option add the file content and give the attachment a name, its important to note that the file name will have to end in the correct file format which for this file is an .xlsx file format. Hit save and test out your flow.
To check the status of all other Power Automate flows, you can use the “List flows as Admin” action in Power Automate. This action returns a list of all the flows in your environment.
NOTE – To run this flow you will need to run it as a user who has admin rights over the Tenant Environment.
To create a flow that checks the status of all other flows, you can follow these steps:
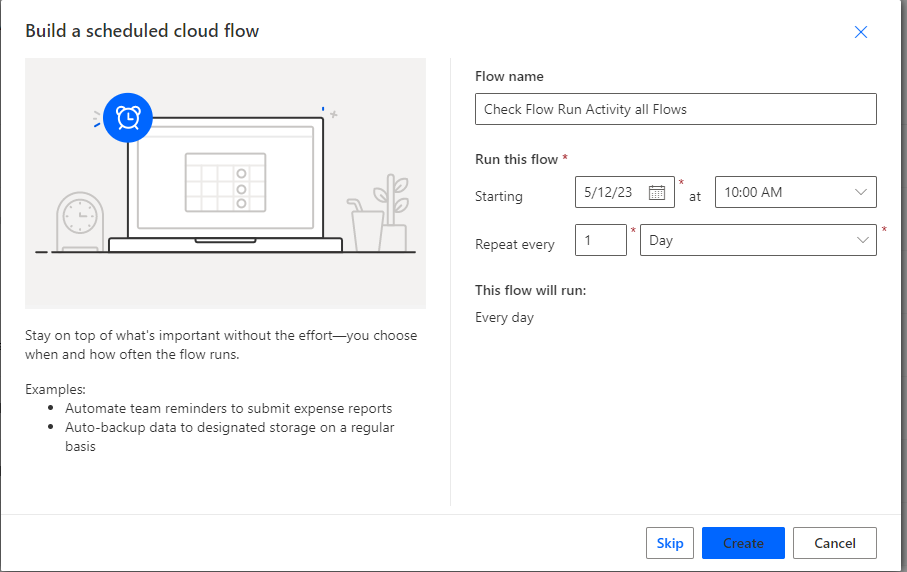
Create a new Power Automate flow and select the trigger that you want to use to start the flow, we would advise using a scheduled flow and setting the schedule to either daily or weekly.
Add the “List flows” action from the Power Automate connector.
Configure the “List flows” action by selecting the environment that you want to check, under the show advanced option on this action select the Expand Suspension Info set this to yes.
Add a “Apply to each” action and select the “value” output from the “List flows” action as the input.

Clearing the Spreadsheet through Power Automate

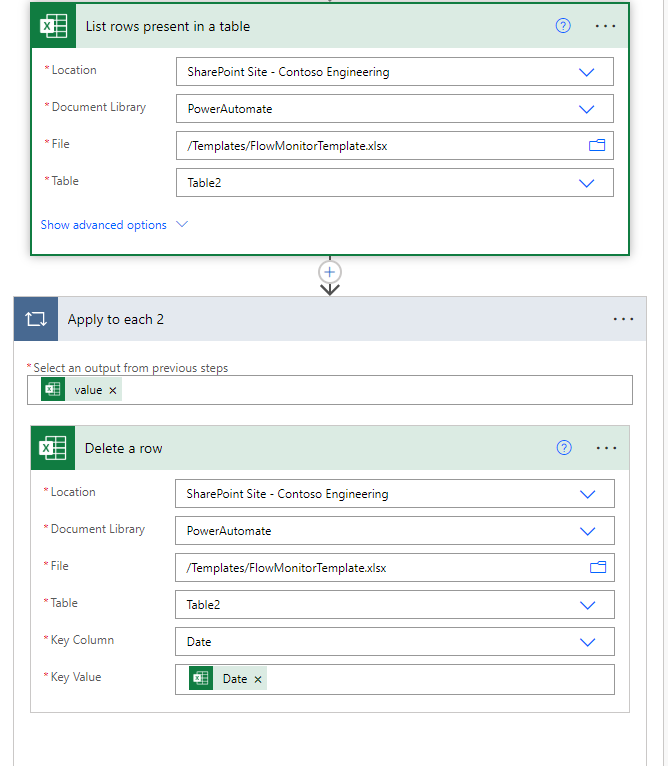
To further improve this flow you can clear the spreadsheet before hand, to do this add a new action List rows present in a table and target the Excel template you created through the above steps.
Next select the excel action delete a row and use the date column as the key value as shown. The Delete row action should be within a apply to each loop but this will automatically wrap the apply to each when you add in the configurable values as shown.
Complete Flow How to automatically check which flows are active, Disabled or suspended

To troubleshoot why a flow has turned itself off or suspended, you can view the flow history in Power Automate. The history will show the status of each run and any errors or messages related to the run. You can use this information to identify the root cause of the issue and take appropriate actions to resolve it. To find this you can look at the flow itself or for a more broad view of all Flows you can view them using the monitor page located to the left hand menu on Power Automate. If you want to know more about how to handle errors in Power Automate read the blog on handling errors in Power Automate Here.
Need SharePoint Help?
Would you like training on SharePoint for your teams? or do you need help setting up your SharePoint knowledge resource and guidance on how to best use the built in tools, schedule a consultation today
