Microsoft Lists
Get the Know How
Administer and start working with Lists

Introduction to Microsoft Lists
Lists are a different way to store data as a collection and interact with each item in a collaborative manner, the data is stored centrally and uses an object-based approach to columns so you can use things like people columns this integrates with Microsoft users, to pull more information about the user such as photo, email, and contact information.
Lists can be created in Microsoft Teams, SharePoint Online or the Microsoft lists app, if lists are created within SharePoint and you have access to them, they will also show up in the Lists app giving a collection of lists which could have been created across several different SharePoint or Teams sites.
As Lists are part of the Office 365 Suite, they integrate seamlessly across the rest of the Microsoft Suite of apps such as Teams, Power BI, Power Automate and Power Apps, they allow for greater automation results and better visualisation of key information in a centralised manner.
Column Types
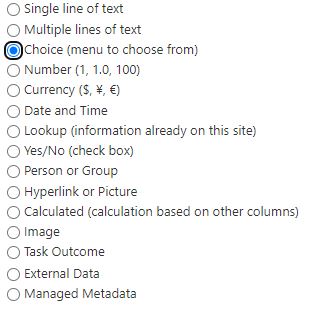
Lists have a variety of columns, including Single line or Multi line of text, Number, Location, Person, Image, Choice, Hyperlink, Currency, Attachments, Date and Time, Lookup to other Lists, Yes/No or even calculated columns based on numerical values in other columns in the same list.

Lookup Columns
A lookup column can be very useful for avoiding duplication and ensuring a consistent data set. To use lookup columns a second list on the same SharePoint site is needed to look up against. This maybe useful if you have a set of addresses and building names and based on the building name you would like to pull the full address into another column.
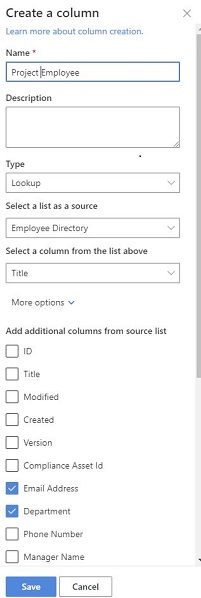
To work with lookup columns first build the second list with the data you desire, then go to your main list add new column select lookup and give the column a name then select the source list to lookup to, and the column you would like to display.
The last part is if you want to pull any additional information form the lookup list to your main list, to do this select the ‘More Options’ drop-down arrow on the create a column view and select the columns from the source list that you would like to display.
Now when you create a new item another field will appear with a lookup to the source list and pull any additional fields into the main list that you need.
Creating lists from Excel spreadsheets
One of the great things about lists is the ability to create lists with data you already have in Excel, the first thing is to make sure you have all the data in the Excel file is stored in a table format.
Once the Excel data is formatted in a table go to lists select new and then select the button ‘From Excel’ upload the file then go through each column and choose the column data type such as text, number, choice option or not to import, click next and you now have your Excel data in a Microsoft List.
Creating Views from Lists
Views enable a different perspective on the same data set, for example you can hide all items where a column value is equal to complete, you can have many views for the same list, filtering is one important aspect to views, but other elements include calculations on column values you can count items, if the column is numerical a sum or average value can be calculated.
A view can be used to hide columns, so the overall view is condensed to only the data you need to see, sorting information is also a part of a list view.
By default the list is All Items to create a new view select where it says all items and at the bottom of the list select ‘Create New View’ give it a name and configure any sorting, filtering, hide/show columns, group the information by a specific column or set an item limit.
Conditional Formatting
Formatting rows of data with colors based on column level logic is something all Excel users will be familiar with, in lists it is very much the same formulas as we see in Excel, conditional formatting happens at the view level so any conditional formatting is based on the view not on the entire list. To add conditional formatting select the down arrow located next to the funnel icon and select ‘Format Current View’ and then select the column which will be used to dictate the row colour then add the logic, if it’s a choice you can set this to equal to or not equal to column value, if it’s a date it can be set to a relative or a fixed date or between a set range then do this.
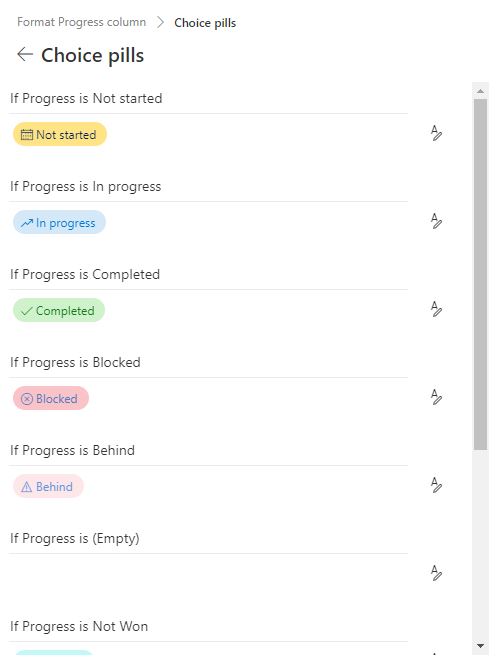
We also have column formatting so on the column level if the value is x then show the column box just for that column as a set colour or icon to do this click the down arrow next to the column then select ‘Column Settings’ then select ‘Format this column’.
List Settings
Behind each list is a lot more configurable options within settings, we will look at some of the key settings here:
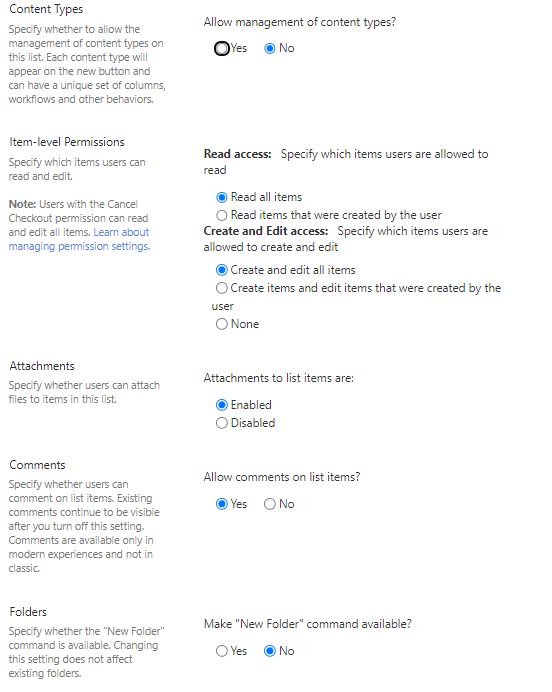
Advanced settings some of the key features of this is the ability to allow users to only read items they created meaning they only see their own items or to create and edit all items or only the items they have created, note this is unless the user is a site owner, or custom permissions have been applied to the list.
Specify to disable comments as well as disabling the ability to upload attachments on list items and hide the list items from SharePoint search.
Validation settings allow to set conditions on what data can be added, this is based on formulas very similar to the formulas within Excel, an alert will be displayed to the user if the validation fails.
List Permissions
The default behaviour for list permissions is to inherit from the SharePoint site group permissions or team level permissions, but these can be overridden to do so follow the instructions below:
Go to the list click the settings cog to the top right, select ‘List Settings’ next select permissions for this list, then select the ‘Stop Inheriting Permissions’ Button located to the top left, a pop will appear click ok.
Now that permissions are not inherited from the main SharePoint or teams site you are free to remove the Visitors and Members and add in users directly, to add users in click the ‘Grant Permissions’ button (top left).
Note when removing permissions please don’t remove the Owner’s level permissions as this could cause problems, also ensure you are the owner of the SharePoint or Teams site when making permissions changes.


Importing Bulk Data into a list
Preparation is key if you want to pull large data into a list, the easiest method is to export your list to Excel through the list view screen and then use that excel file as a template, once your data is organised in Excel copy all the rows open the list and select the ‘Edit in Grid view’ option and select a full row and hit Ctrl+V on the keyboard to paste the values, it may take a few attempts to paste it correctly due to the cursor going into the one box and attempting to paste all values in the one field.
You could consider using Power Automate instant cloud flow or scheduled flow to import the data if it is something repetitive like a monthly upload of accounts information or similar but that’s a slightly different topic beyond the scope of this blog post.
See a real world example of how lists can be used with Power Automate to build your own Fully Automated Employee Directory


Modifying the list layout & item design
When viewing the individual item (double click the item) sometimes the details are in the wrong order or due to the number of fields the users have to scroll down to see all the information, further customisations can be made to this view.
Reordering the columns in the form view, open an item click the two squares with a pencil icon then select the edit columns button, when hoovering over a field you will || you can hold down mouse press on here and drag and drop them into the desired order then select save to save form view changes.
Note – you cannot change the view of the list in using the above to change the column order in the view select edit view and change the numerical value which is along side each column to reorder.
The New item screen and edit form view screen can also be adapted but require a little bit of JSON code, but that’s ok as Microsoft provide some detailed information on how to do this.
SharePoint List Custom Formatting customising the form body, note in the JSON code below the Fields are the fields of your list column names, also when you have renamed the title column the column name in the would still be title even though it has been renamed all the other columns created will be named the same as they appear in the list.
Example Body JSON code
{
“sections”: [
{
“displayname”: “Project Details”,
“fields”: [
“Title”,
“Description”,
“Category”,
“Priority”,
“Est Cost”,
“Notes”,
“Attachments”
]
},
{
“displayname”: “Timeframes”,
“fields”: [
“Start date”,
“Due date”,
“Assigned to”,
“Progress”
]
},
{
“displayname”: “Project Closure”,
“fields”: [
“Actual Cost”,
“Date Completed”
]
}
]
}
SharePoint List Header Formatting example code above please note the list we are using has a choice type column labelled Progress and another choice type column labelled Priority so to use the below Header code either add those columns to your list or adapt the code below changing the values to suit your own column names and choice types.
Example Header JSON Code
{
“debugmode”: “true”,
“elmType”: “div”,
“attributes”: {
“class”: “=if([$Progress] == ‘Completed’, ‘ms-bgColor-greenDark’, if([$Progress] == ‘Quote Not Approved’, ‘ms-bgColor-redDark’, if([$Progress] == ‘Quote Not Sent’, ‘ms-bgColor-red’, if([$Progress] == ‘Not Won’, ‘ms-bgColor-red’, if([$Progress] == ‘Blocked’, ‘ms-bgColor-redDark’, if([$Progress] == ‘Not started’, ‘ms-bgColor-blueMid’, if([$Progress] == ‘In progress’,’ms-bgColor-blueMid’,’ms-bgColor-orangeLighter’))))”
},
“style”: {
“width”: “99%”,
“border-top-width”: “0px”,
“border-bottom-width”: “1px”,
“border-left-width”: “0px”,
“border-right-width”: “0px”,
“border-style”: “solid”,
“margin-bottom”: “16px”
},
“children”: [
{
“elmType”: “div”,
“style”: {
“display”: “flex”,
“box-sizing”: “border-box”,
“align-items”: “center”
},
“children”: [
{
“elmType”: “div”,
“attributes”: {
“iconName”: “Bug”,
“class”: “ms-fontSize-42 ms-fontWeight-regular ms-fontColor-white”,
“title”: “Issue”
},
“style”: {
“flex”: “none”,
“padding”: “0px”,
“padding-left”: “0px”,
“height”: “36px”
}
}
]
},
{
“elmType”: “div”,
“attributes”: {
“class”: “ms-fontColor-white ms-fontWeight-bold ms-fontSize-24”
},
“style”: {
“box-sizing”: “border-box”,
“width”: “100%”,
“text-align”: “left”,
“padding”: “21px 12px”,
“overflow”: “hidden”
},
“children”: [
{
“elmType”: “div”,
“txtContent”: “=if ([$Priority] == ”, ‘Medium’, ‘New Project: ‘ + [$Title])”
}
]
}
]
}
More Resources
Read More about custom SharePoint list layouts here
For the Icons linked on the header code please refer to the Icon Names Library
Read more about list item designs see the Microsoft documentation
Conclusion
Microsoft Lists are a fantastic collaboration tool and if set up properly as described above, they have huge benefits to any team, some of the common use cases for lists include, Issue Tracker or Service desk tracker, Annual leave requests, Sales Tracker, Financial order approvals, employee directory and many more it can list what ever you want it to with a little configuration. Read more on lists through the Microsoft page here https://support.microsoft.com/en-us/office/introduction-to-lists-0a1c3ace-def0-44af-b225-cfa8d92c52d7
Need SharePoint Help?
Would you like training on SharePoint for your teams? or do you need help setting up your SharePoint knowledge resource and guidance on how to best use the built in tools, schedule a consultation today
